3 Methods To Fix Ads.txt file issues on Blogspot and Wordpress
How To Fix Google Adsense ads.txt file Issues on Blogger Blog (Blogspot) in 3 Simple Steps
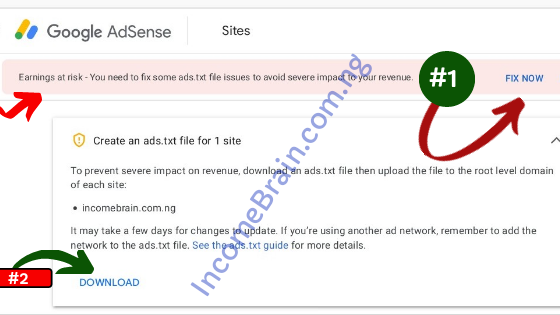
Did you receive a message in pink or red in your Google Adsense Account like what you can see in the image below?
If you received this message, you have to be fast in fixing the issues before Google AdSense Team review your AdSense Account again and Limit Ads serve on your site or blog.
But, the worst part of this notification message is that it is not easy to fix just like that.
You have to know your root domain level and also down the ads.txt file from your Google AdSense dashboard that contains your unique publisher ID of your AdSense Account for that particular site you see the message, that is if you have more than one site connected to your AdSense Account and receive the same messages, you have to download each and every of their ads.txt file and upload to your site or blog.
In this tutorial guide here on IncomeBrain Network Blog, we are going to show you how to fix this problem on Google Blogger (blogspot).
How To Fix Ads.txt File on Blogger or How To Fix Ads.txt File in Blogger
Must Read: 3 Quick Actionable Steps To Make $100 /Weekly With Google AdSense on Your Site
But First,
What is ADS.txt File?
According to Google AdSense official support page (website) describe ADS as Authorized Digital Sellers, or ads.txt is an IAB initiative that helps ensure that your digital ad inventory is only sold through sellers (such as AdSense) who you’ve identified as authorized. Creating your own ads.txt file gives you more control over who’s allowed to sell ads on your site and helps prevent counterfeit inventory from being presented to advertisers.
We strongly recommend that you use an ads.txt file. It can help buyers identify counterfeit inventory and help you receive more advertiser spend that might have otherwise gone toward that counterfeit inventory.
Fix ads.txt issues in AdSense
If there’s an issue with ads.txt on your site, you’ll see an alert in your AdSense account. To prevent severe impact to your revenue, follow the steps below to fix the issue.
Note: It may take a few days for your changes to be reflected in AdSense. If your site doesn’t make many ad requests it may take up to a month.
General Method: How Create an ads.txt file for your site
* Sign in to your AdSense account.
In the alert on your homepage, click Fix now.
Click the Down arrow Down Arrow to open the “Create an ads.txt file for…” message.
Click Download. Your ads.txt file is automatically downloaded.
Upload the file to the root level domain of your site (for example, https://example.com/ads.txt).
Root levels are one level down from what’s listed in the public suffix list. For example, “google.co.uk” is a root domain of “co.uk” but “maps.google.co.uk” is not. See the IAB ads.txt specification.
Note: If you’re using another ad network, remember to add that network to your ads.txt file. Contact your ad network for their ads.txt information.
Add your publisher ID to an ads.txt file
Sign in to your AdSense account.
In the alert on your homepage, click Fix now.
Click the Down arrow to open the “Add your publisher ID to these ads.txt files” message.
Click Copy.
Paste the line into each of your ads.txt files.
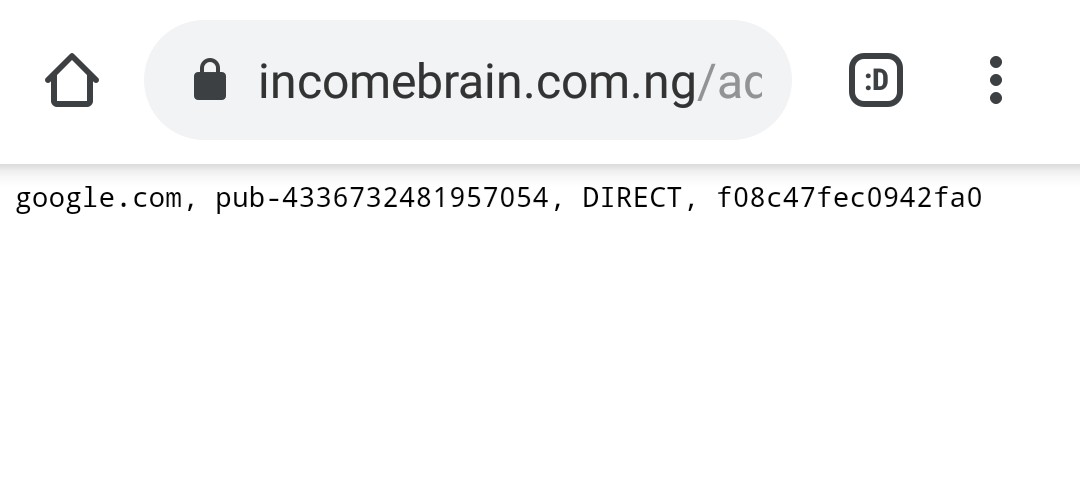
Your ads.txt file should now look like this, where pub- **************** is your own publisher ID:
google.com, pub- **************** , DIRECT, f***************
Now, if you are Blogger using Google AdSense as monetization.
Your CMS can either be WordPress or Blogspot!
So, let me practically show you how to fix this ads.txt issues for both platforms.
Must Read: 2 Other Fastest Ways To Make Real Money Blogging
How To Fix Google AdSense Ads.txt File Issues On Wordpress
Doing some settings on Self hosted wordpress is very easy and confusing to newbies.
Here are Steps for Wordpress:
Step 1: Download the ads.txt file
Step 2: Open the downloaded file and copy all text and your publisher’s code. (copy all)
Step 3: Log in to your Wordpress Dashboard and go to Plugins.
{install a plugin that can allow you paste code to your theme, alternatively; choose from the following plugins listed here. Wordpress ads.txt Plugins}
Step 4: Activate the plugin and paste your ads.txt code and save.
I would show you how to check if your settings were save successfully.
see How To Fix Ads.txt File in Blogger
How To Fix Google Adsense Ads.txt File Issues On Blogspot
How To Fix Ads.txt File in Blogger
Note: If your blog is not monetized, or it’s only configured to use AdSense using the Blogger-AdSense integration, then you do not need to manually set up ads.txt. Blogger will do this for you.
How To Check If Your Settings Are Save Successfully
Research Source: Google Adsense Help Center
From My Research, here is another Problem I encounter after getting it solved and wanted to do some SEO work on my Blogspot blog and I made research and from experts, they advice me to add Robots.txt file and enable Custom Robots Header Tags which I don’t know was the beginning of my destruction.
Adding Robots.txt file was pretty okay and works well with SEO practice and Google Adsense but Custom Robots Header Tags is not friendly to Google Adsense crawler, especially when not properly done.
It can block Google Adsense Crawler!
In the remaining party of this post, I would show you how I fixed ads.txt file after I added it to my blog and Adsense could not find it after working on my On-page SEO.
How To Re-Add Google Adsense Ads.txt File To Blogspot Blog (After Adding It The First Time)
This method is simple but very difficult to do if you don’t read this my post.
I could have created another post for this but I felt like updating this page, it is not by the quantity of blog post you have but the quality of the blog post that makes you rank number #1 on Search engine.
To tell me thank you for this secret tips I am about to share with you is to help IncomeBrain share this post and give a link back to this post.
Thank you in advance.
After adding Adsense Ads.txt file to your blog using the above mentioned steps for both Blogspot or Wordpress site and you received another message on your google Adsense dashboard warning you again, here is how to fix it again.
Simple Step To Fix Ads.txt File Correctly On Blogspot Blog Now
Follow me!
How To Fix Ads.txt File in Blogger
The trick is simple, if you enable Custom Robot Header Tags, that is the root of the problem.
Google AdSense Crawler could not find it on your site, not because you do not add it but because Custom Robots Header Tags is blocking the bot for accessing it.
Go and unchecked “Yes” and check “No”.
Remember to click “save changes,”.
You are done.
Go to your Google AdSense Dashboard and you would still find the same message, wait for at least 7 days or more for crawler to recrawl your site and update information.
Then, you have finally Re-Add Ads.txt file .
Good luck.
